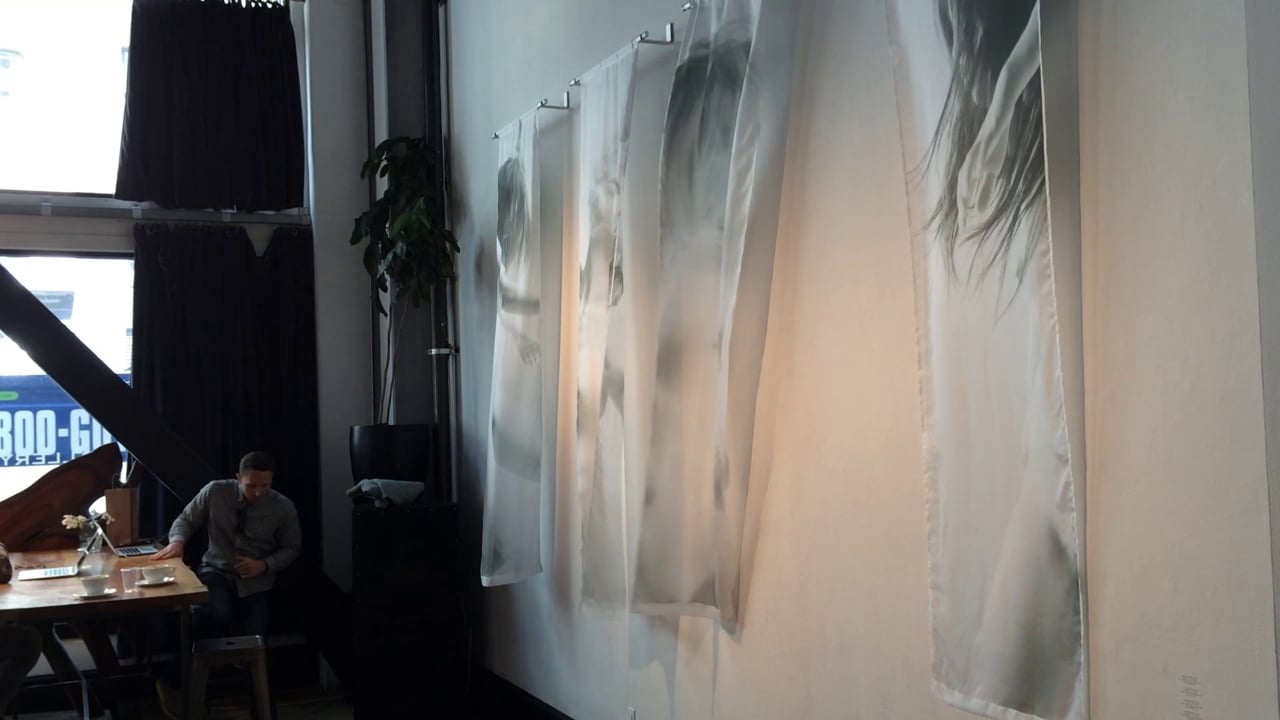
Dream Away in silk
I’m grateful to have moved through the process of developing my series Dream Away for the show at 111 Minna Gallery. The presentation brought with it challenges that allowed me to look at different ways to view the pieces for the show. I’m quite happy to include along with the prints a collection of silk banners and two films. The combination of these elements makes for a truly immersive experience at the gallery. Getting there of course was a balance of how to play very dominant elements while including traditional presentations.
The many facets of Dream Away
I’m beginning to explore ideas for my upcoming show at 111 Minna that delve into alternate facets of the project. The light and floaty nature with an almost suspended yet certainly in motion bodies are naturally lending themselves to a exploring their beginnings and ends. But in turn, they also lend themselves to a twists and turns in their character. Read More
Dream Away in Snap!
The power of the personal relationship is a great way to forge and strengthen your path to future opportunities. Case in point, Ransom & Mitchell had the pleasure of showing at Patrick Kahn’s gallery Snap! in Orlando, Florida as part of the Art Attacks co-curated show this summer. Stacey made her way back to where she spent the bulk of her childhood and had an opportunity to hang out with Patrick a bit. One of the subjects they touched on was about my new nude series Dream Away. It was my impression that he would enjoy the work, and that hopefully the aesthetic would fit in with his offerings (or at least he could help point in the right direction).
Turns out my gut was correct, he responded well to the series and has asked for three pieces to be in a selection of contemporary photography showing along side All About Warhol at CU-1 Gallery in Miami, Florida. The reception is Friday, September 19th from 7pm to 10pm — please stop by if you get the chance. I’m quite pleased that so far this series has been finding open doors in the fine art world.
Dream Away series makes a debut
I’ve been working on a new nude series this year called Dream Away. The images are light, floaty, dreamy if you will, and capture a certain otherworldly spirit. These started off as an ethereal vision that I had floating in my mind, something that I wanted to materialize. I was also drawn to it as it seemed like a project I could mull over, shoot a few sessions, play with it a bit, shoot more — something that I could both explore different facets of, while refining a core thread of the series. Already I have a decent idea of a concrete variant that may become it’s own series to develop.
Part of the inspiration for the series was to approach them much in the same way as a pencil sketch — focusing on an interesting form, developing strong lines, and letting other elements go. The technical approach is more subtractive that additive, in that I begin with a full figure and reduce it to the core spirit. This is augmented by the use of blur to let certain elements go, while employing careful dodging of the image to continue to draw the eye in.
The results are beginning to get some notice, and I’ll be showing one next month at ModernBook Gallery in SF as part of the APA SF Curator’s Voice show. I’ve already received a positive response on the series as a whole from the guys at MB and am looking forward to them possibly handling a few more pieces in the months to come.
Shows and more shows
We have been enjoying a rush of showings at the moment, with three major ones hanging in October. As this spooky time of year approached, we were hit up to help celebrate the season with our fine art work.
Anthony Luzi at Bash Contemporary put together a great group show Hallow Be Thy Game that mixed our digital art with that of Larissa Kulik, Danny van Ryswyk, and the dolls of Stefanie Vega. In this show, we presented our largest printed work to date: a 60″ x 40″ of It Will Be Ours ornately framed — the details in the piece were stunning to see. Kaytee Papusza brought in a model to wear her fabulous dress during the opening, and Doug from SaveNature.org arrived with a collection of the insects used in the piece for everyone to handle and enjoy.
Spray it, don’t say it
The spray varnish I had picked up from a couple of locations. This turned out to be the thing that made the difference in my testing. I was using Moab paper, so it does make sense that their varnish works with their paper. My first few tests I found that it went down very well, and I was a big fan of the drying time before laying down another coat – 15 minutes. As it was a fine mist that dried well and nicely even, I found that I could even push it a bit in the coating process. It was rated for UV and scratch protection as well, so I felt like this was quickly becoming a winner. The finish luster was an almost perfect match, and I found that I had some difficulty in telling if it was on without a close inspection. There was a slight loss in contrast, but very minimal. After letting it cure for an hour (my choice) I decided to go for the water test. I dribbled water directly on the print and let it sit for two minutes — enough time to find it’s way in through the varnish and a simulation of me running to find a cloth to clean it off. I then grabbed a blue shop paper towel and rubbed it clean. It passed with flying colors — no damage from the water, no damage from my rough cleaning job. Perfect! But …

I did a few more tests and came up with a spray pattern that I liked: three passes — vertical, horizontal, vertical with a stroke in each direction and then slightly overlapping as I worked my way across the print. I’d print leaving a larger margin on the paper so I could tape the print to a wall and use the can upright. This gave me a solid coat that I could see and feel on the work. My problems came however when I switched to a new can — suddenly I had sputtering. I had heard about it, but not run into it yet. I had just finished one coat on a piece when my can ran out, so I moved to a new can for the follow up. Mid-spray there was sputter and that meant a ruined print. (sad face)
It took me a little to figure out what was going on. Luckily I had just had some good conversations with some friends who do graffiti and they turned me on to the vast differences in nozzles. My discovery was confirmed later by a rep from Moab, that there was a nozzle they were having trouble with that they pulled from production … I had found one in someone’s existing stock and it was jamming me up. Nozzles are easily replaced, and so I swapped them out and we were back in business. Like my friends, I too now have a little nozzle collection going. Back in business, but I still do a little spray check before committing the varnish to the work. (happy face)
Seal it up
So I had picked the paper, the printer, the process, and the presentation. But we had a gap … you can put up unprotected work and expect it to last. Having a little one run around the house results in little surprises. One time I was passing by a framed James Jean print on our wall and discovered that it had been caught in some sort of splatter attack. Having discovered this some time after the event, it was well dry, but the outlines of drops of mystery liquid were certainly present. So litmus test one: survive a splash attack.
Ink jet paper — by it’s very nature — is porous and loves to suck up liquid. Ink jet ink is soluble and love to moush around in water. We needed a barrier to help fix the work and protect it from the typical damaging effects of the outside world. Living in a house with floor to ceiling glass windows, I know the other main damaging effect is exposure to UV rays. In painting media, an artist will typically varnish their work to help seal it in and protect it in this same manner, so it seemed like a logical step for us as well.

I picked up a couple of varnishes that were designed specifically for (or marketed toward) ink jet paper. This included Moab Desert Varnish Spray, Breathing Color Timeless and a couple other varnishes from wood working etc. As they come in specific finishes, I needed something that would match the luster-quality of the product I already was using.
I was biased against spray varnishes as I had heard horrible results from some folks of sputtering — large drops coming out instead of a fine mist which don’t even out. Liquid varnishes I had already used in a few cabinet making projects I undertook while fixing up our house, and was partial to them. But I liked them best when I could spray them on using a gravity fed sprayer — that means I’d need a spray booth to contain the overspray. Liquid varnish also has a longer drying time than the spray varieties.
In the first few tests using the liquid varnishes, I found the paper was unforgiving in strokes. I couldn’t put it on too thick or the inks would immediately start to pick up. Any mistakes or bubbles and I couldn’t brush them away, and they weren’t settling out. My paper choice was fighting this method and I had a zero success rate. The best result I had was using a high-quality brush to lay down a thin, consistent stroke. But I was still seeing some dust settle in and pinholes in the varnish. It seems that the liquids were much better suited to a canvas style paper. On to spray …
Hanging around
One of the “a-ha” moments I had during our trip to LA this past summer was how we should be presenting our work. Our piece Ophelia was in the APA LA show and used it as a great excuse to head south and check out a number of galleries and get a beat on the scene’s vibe.
We had be matting and framing the prints behind plexi or glass and they had an almost reserved feeling … it was creating a barrier between the work and the audience. The presentation should compliment the work, take it to a new level, instead of just being an attempt at showing it.
In doing my research on framing and photography, it seems up until about 30-40 years ago, photographic prints were simply pinned to the wall, enjoyed temporarily, and never framed. Then a shift came in mounting, framing, and putting behind glass. As a relatively younger medium, there is less of a consensus on the proper displaying and archival methods when it comes to photography. Archival generally means that you can separate the work from the presentation in the future for restoring and reframing. The materials should not negatively interact with the work and cause any damage from adhesives or acid migration. But the work should be displayed as the artist intended. That last section is the loophole that I intend to exploit, and live in that gray area that we seem to find ourselves so often.

Photographs being a printing process that these days is (for the most part) perfectly reproducible, and there are a number of options for displaying them. To get the most our of our images, I settled on an inkjet on paper process as it retained the most detail, shading, and color. A common choice for photographers, but now how to display it. But in our experience so far, putting those images in a frame and behind glass destroyed the presentation, making the images washed out or even unviewable. With our show at Varnish coming up, we needed a good solution.
Our work is borne of the photographic medium, but it quickly departs from traditional works with the use of sets, photo illustration and surreal concepts. Coupled with the lighting style we apply, it pushes the boundaries even more, resulting in a conundrum. As I was making correlations to some of the galleries we were visiting, the decision became quickly apparent.

Aside from being in a photo show, we visited the traditional photography galleries Stephen Cohen who had contemporary photographer Joey L and Fahey/Klein who has a number of historic works — all framed and behind plexi/glass. We also stopped by Copro for Annie Owens’ Motherland opening and Corey Helford who had a group show that included works by Ray Cesar and other digital artists, and a quick stop in La Luz de Jesus. This was a great combination for comparing different styles of work and their presentations.
We decided to embrace our subject and style, more so than our medium, and present as our contemporaries — put the works in an ornate frame, without glass. Often the first comment we hear is how painterly our work is — if they even discern that it’s not a painting and rather a print. Go with that, and push that correlation even more, until it hurts, challenge assumptions, start a dialog. Great … it was decided! Now, how to accomplish that … that’s a bit of uncharted territory. Next up: Seal it up.
Printing – the paper chase
The first step I pursued in printing our work ourselves was to go through a sizable paper test. Thankfully, most of the quality paper manufactures have put out sampler packs for just such occasions. I grabbed papers from Hahnemühle, Moab, and Canson. I had been doing a little printing on a number of Epson papers already so I felt I had an okay grasp of their products. Our work has two main aspects that I wanted to make sure the paper could handle: dark blacks, and fine details especially in the shadows.

I found that any kind of deep gloss, while accentuating the blacks, would interrupt the viewing in a number of situations. This is also one of the reasons I was looking for a solution that didn’t require putting the print behind glass or plexi. I also wanted to have the audience experience similar to viewing a painting — another reason for a rich paper and no glass. I knew that the second part of this equation was that the print/paper would need to take a varnish (varnishing will be covered in a separate write up).
For my sampling, I took a couple of hero areas of our works that I knew would flex the muscles of the paper and prepared a test print, and then I went to town. As a baseline, I used each paper’s profile for my test printer, an Epson Stylus Photo R2880 (the test papers are 8.5″ x 11″), switching between photo and matte blacks as needed. The breadth of papers available was quite enjoyable to see. There were good textures (and some I felt over-pronounced), and a real range of responses to our work.
The first realization was that I could not go with any kind of textured paper. Straight on lighting and viewing were fine, but any kind of off-axis presentation or lighting quickly diminished the work with shadows. The texture didn’t help hold the detail as well as I felt it was competing for the eye’s attention. Also, to hold up to the dark details, there needed to be some kind of sheen to the paper — even the best matte paper while just being able to get dark enough in the blacks couldn’t hold the exposure in the knee — the shadow areas quickly fell off. Some level of printing adjustments helped with the matte papers, but that would translate to a ton of rework and test printing to get it close, but not as good as the original.

One of the earlier papers I had picked up at Flax one day was a pack of Lasal Exhibition Luster 300. I must admit that part of my decision was cost based, as it was half the price of the Epson paper I was using. I liked how it performed, but wanted to be diligent in my search for the best presentation with our debut solo show on the horizon. It was indeed this paper that went the darkest, and held the details with a very low sheen level. And, it was readily available to accommodate last-minute printing requirements so I wouldn’t have to keep too much stock on hand.
Another fun paper that stood out in all this testing was also from Moab — their Slickrock Metallic. The coating has a metallic luster to it that is quite lovely. Stacey called it that this would be the perfect paper for the low-light, strong contrast nude series that I had been shooting. Was she ever right, as the negative spaces of the body’s highlights jump right off the paper and add an unexpected depth and forward dimension to the printed pieces — complimenting the work and letting the live presentation be extra complex. One of these will be hanging at this year’s APA SF Something Personal.